I am calling this my successful fail, this was my first attempt at using a couple of new tools. It was a fail because it did not turn out how I would have liked but successful because I learned some valuable lessons in the process.
Lesson #1: The Pen holder for the Silhouette Cameo:
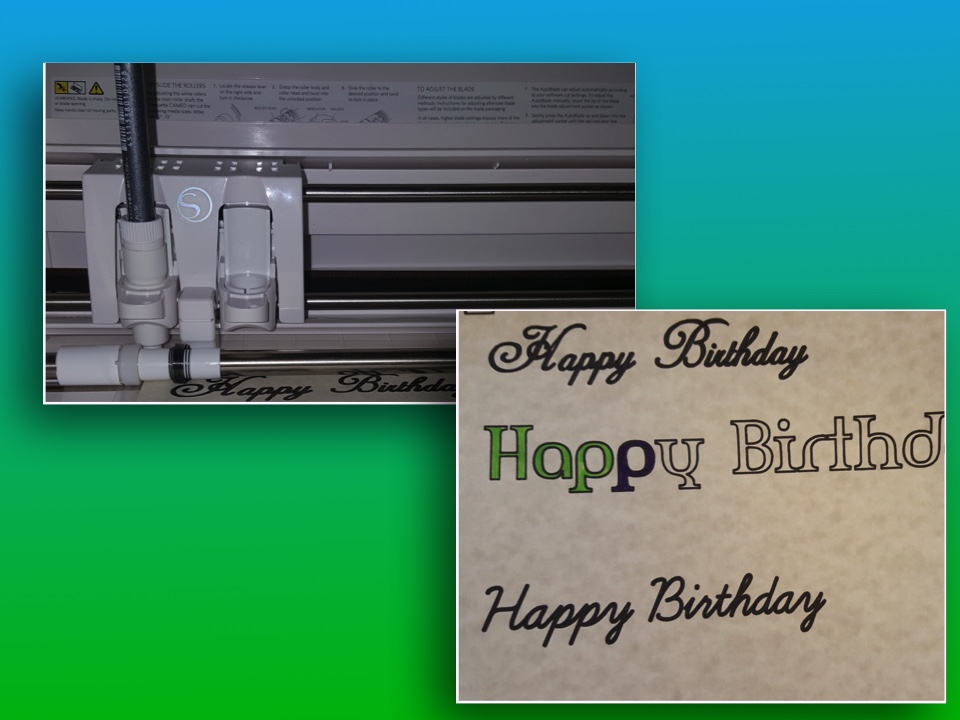
I took a chance on this tool, I was not sure if it would work in the new machine, all the videos on you tube had shown the older machine. After using the Sketch pens made for the machine, which I am not a big fan of because my last card I made the ink skipped. I wanted to make sure the ink would not skip again so I figured I would test out a couple of pens in the holder. What I found was the shape of the pen makes a difference. I love my micron pens but I find they did not fit as well as the Copic multiliners, the Copic pens are fatter near the tip so it was a snug fit and did not slip. The Micron are thinner near the tip and it slipped from the holder. Here is the test sheet I did with a few different size nibs and the outcome was perfect:


Lesson #1: The Pen holder for the Silhouette Cameo:
I took a chance on this tool, I was not sure if it would work in the new machine, all the videos on you tube had shown the older machine. After using the Sketch pens made for the machine, which I am not a big fan of because my last card I made the ink skipped. I wanted to make sure the ink would not skip again so I figured I would test out a couple of pens in the holder. What I found was the shape of the pen makes a difference. I love my micron pens but I find they did not fit as well as the Copic multiliners, the Copic pens are fatter near the tip so it was a snug fit and did not slip. The Micron are thinner near the tip and it slipped from the holder. Here is the test sheet I did with a few different size nibs and the outcome was perfect:
Lesson #2: Make sure you have a plan:
I had a partial plan when I started this project, now this card was not meant for anyone, it was an experiment. I had an idea of what I wanted to create. I Started with a very simple sketch, balloons for a birthday card:

I needed a colored background but I did not want to use a preprinted or scrapbook paper, I used watercolors and created a fun background full of color:

Time to cut out the balloons, I scan the simple sketch and make the changes I need to get a good cut. I did not want to waste a perfectly good back ground so I cut the balloons out of the entire page, there are a lot of little ballons.

Now time to put the card together, I used one of my Micron pens in the pen holder to write "Happy Birthday" at the bottom of the card. This is where I learned lesson #1, the pen slipped from the holder but thankful still wrote out "Happy Birthday." Staying with my plan, I placed the balloons where I wanted them, once I was happy with the layout, I tied crafting floss to the balloons then used adhesive foam squares to put them in place. It added some nice dimension to the card.

After getting the outside of the card done I took another look and it seemed like it was missing something, I am not a fan of a lot of negative space and this card has way to much, so it will be back to the drawing board for that. There is one last very important thing I forgot to add to this card (even if it was just an experiment), the inside message. When I realized I forgot to put that in it was too late so thankfully this was't for anyone.
No matter how this card came out I had fun making it and I have an idea of how to get rid of the negative space so it is on to experiment #2 tomorrow, I have plenty of little balloons floating around.
Comments